Leftover Turkey- Salsa Verde Enchiladas

You have made it to the other side. You survived Thanksgiving. Memories were made. Food was yummy. And now you have leftovers. Don’t get me wrong. I love Thanksgiving leftovers but there is only so many turkey cranberry sandwiches one person can eat. My Texas roots always have me turn to Turkey Salsa Verde Enchiladas. You can use white or dark turkey meat. Add in some chips and salsa and you have a great meal.

20151129_1842141739676448.jpg

Turkey Salsa Verde Enchiladas

Flour Tortillas, 8 medium

3 cups Cheddar Cheese, shredded

3 cups Turkey, shredded

2 cups Salsa Verde

2 avocados, diced

1 small red onion, diced

1/2 cup cream cheese, softened

1/2 cup Fresh Cilantro, minced

I T olive oil

Preheat oven to 350 degrees.

In a small pan, add olive oil and onions. Cook onions until translucent.

In a medium bowl combine salsa verde and cream cheese until well blended.

In a 13×9 baking dish, cover the bottom with salsa verde.

Now begin assembling your enchiladas- lay tortilla flat and fill with turkey, cheese, red onion, avocado, cilantro and 2 tablespoon of salsa verde mix. Roll enchilada and place into baking dish with seam down. Continue until all tortillas are complete. Top enchiladas with remaining salsa verde and shredded cheese.

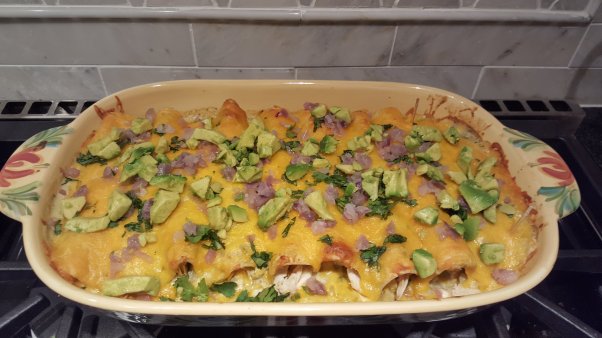
Bake enchiladas for 30 minutes. Then top cooked enchiladas with additional red onions, avocados, and cilantro.

Roasted Butternut Squash

It’s the week of Thanksgiving and you might be looking for one last side dish.  Pick up a butternut squash and I bet you have the rest in your pantry.  Roasting butternut squash is super easy and completely tasty.  I love the balsamic vinegar in this recipe.

You can prep your butternut squash in the morning and throw it in the oven thirty minutes before dinner.

20171119_121518603352250.jpg

Roasted Butternut Squash

2 cups butternut squash, peeled, seeded and cubed

3 T olive oil

2 T balsamic vinegar

2 T unsalted butter, melted

Preheat oven to 425 degrees.  Mix together olive oil, balsamic vinegar, and butter.  Toss the butternut squash in mixture.  Pile squash into a single layer on a baking sheet lined with parchment paper. Then season well with salt and pepper. Roast, stirring once about halfway through, until fork-tender and golden brown, 20 to 25 minutes. Remove from the oven.  Serve warm.

The Naked Turkey

20171117_132526300158946.jpg

I started teaching when I was in the second grade.  My Cabbage Patch Babies were perfect students.  As I got older, there was no doubt I wanted to become a teacher.  I was blessed to be in elementary school for fifteen years on my career.  Some of my time was in kindergarten.  I LOVE kindergarten!!  The happiest place to be in a school is the kindergarten wing.  These little sponges love life and learning.  And I was lucky enough to be part of their journey.

My first year of teaching, I created a “Naked” Turkey.  First of all, when you are five years old, it is fun to say “naked.”  We would create the body of the turkey by ripping up brown paper sacks.  Yes, it was good fine motor skills too.  Then we would glue our pieces on to a poster board.  But our turkey was “naked” and needed feathers.

So, throughout the week before Thanksgiving we would add feathers.  Some were created at home and some in our art center.  I always loved seeing our turkey on the final day.  All the colors, fingerprints, and imaginations of the students.

Well, you can take me out of the classroom but you can’t take the classroom out of me.  I began creating a “naked” turkey at home with the boys.

This year, I got out new art supplies each day so that Whitaker and I could create feathers.  Stickers, stamps, paint, glitter, etc.

So you have a whole week and your little ones are home with you.  Why not create a naked turkey?  They will look forward to the quality time creating feathers with you and I promise you will LOVE your finished project.  If you make a naked turkey, please share!

Plus you get to say “naked” but as moms we get to say that a lot already.

Looking Forward,

Amanda

Sweet Potato Casserole

And at most Thanksgiving tables, we find some sort of sweet potatoes.

There are so many ways to make sweet potatoes.  Some are great and some are just yuck! This little sweet potato casserole is like dessert.  The first time I had this dish, we were sharing Thanksgiving at my parents house.  My sister made this side dish and we all went crazy.

If you believe sweet potatoes must be served with marshmallows, I will not judge. You probably like Peeps too, again, not judging.   You can add them to the top.  But you honestly do not need them.  The sugars and pecans make this dish come to life.

20151126_175819-11477024264.jpg

Sweet Potato Casserole

3 cups cooked, sweet potatoes

1/2 cup white sugar

2 eggs

1 cup butter, divided (1/2 cup melted & 1/2 cup softened)

1 T Vanilla

1 cup brown sugar, firmly packed

1 cup chopped pecans

1/3 cup white flour

Peel and mash potatoes.  In a large bowl add eggs, white sugar, 1/2 cup melted butter, and vanilla.  Mix with an electric mixer.  Place in a 13X9 buttered baking dish.

Mix brown sugar, pecans, and flour.  Then add 1/2 cup softened butter.  Sprinkle on top of potato mixture.   Optional:  top with  1 1/2 cup of  mini marshmallows.  I don’t do this but some like it.

Bake at 350 degrees for 30 minutes.  Serve warm. And leftovers are yummy too!

Thanksgiving Pie– No More Choices

Every year we plan out our Thanksgiving menus.  Turkey, Sides, Appetizers, Beverages, and Desserts!  Oh the desserts!  We are traditional and make Pumpkin and Pecan Pies.  I have thrown in a Chocolate Bourbon Pecan Pie (YUM!).

When I hit the dessert table, I usually take a little bit of everything.  (It’s the right thing to do!)  But what if two of your favorites were combined.  Like Pumpkin Pie married Pecan Pie!!

Well, it happened the other night in my kitchen.  A few years ago, Southern Living introduced this little union.  And we all lived happily ever after! You need to plan to make this pie the night before serving.  It is better when it has time to completely cool and flavors will pop.  I have made a few adjustments to the recipe and it is perfection.

 20171112_201623.jpg

Preheat oven to 350°. Sprinkle work surface with powdered sugar. Roll out piecrust, and place on prepared surface. Sprinkle piecrust with chopped pecans. Place wax paper over piecrust and pecans, and lightly roll pecans into crust. Fit piecrust, pecan side up, in a lightly greased 9-inch pie plate; fold edges under, and crimp.

Mix together pumpkin  and next 6 ingredients in a large bowl until smooth and well mixed; pour into prepared piecrust.

Bake at 350° for 20 minutes.  Remove and shield edges with aluminum foil or crust protector.  This will keep your crust from burning.  Then bake an additional 25 minutes.

While pie is baking, you will create your pecan streusel topping.  This will create the pecan pie element to your pie.

For Pecan Streusel:
1 1/2 cups pecan pieces
1 cup firmly packed light brown sugar
1/4 cup all-purpose flour
1/4 cup butter, melted
1/2 t pumpkin pie spice
Mix all the pecan toppings together until well blended.After pie has baked 45 minutes,  gently top pie with Pecan Streusel Topping. Reduce oven temperature to 325°,  and bake 10 minutes. This will allow streusel to golden a bit. Then cover pie with aluminum foil.   Cool completely on a wire rack at least 3 hours.  Once cooled, place in refrigerator over night.  This will allow all the flavors to go crazy.
20171113_202303496302890.jpg

Bourbon Vanilla Cranberry Sauce

We are on the official countdown to Turkey Day!  I will be sharing some of our favorite Thanksgiving recipes over the next few days.  For several years I made this Cranberry Sauce.  This sauce is yummy and has all the ingredients you want on your Thanksgiving table.  But then I discovered the beauty of mixing bourbon and vanilla to cranberries. And now this is our favorite!  Enjoy!
Bourbon Vanilla Cranberry Sauce

14 oz fresh cranberries

1 cup sugar

1 cup water

2 T Bourbon

1 T Mexican Vanilla

Combine all ingredients in a large sauce pan.  Bring to a boil. Reduce heat and simmer until cranberries burst and begin to break down, about 10-15 minutes.

20151226_182829.jpg

Stir well and remove from heat. Refrigerate the cranberry sauce for up to 3 hours before serving. But feel free to get ahead and make it the day before.

IMG_8012.jpg

Our Thankful Tree

“Give thanks in all circumstances; for this is the will of God in Christ Jesus for you.” 1 Thessalonians 5:18

November brings a month of Thanksgiving.  A time to truly give thanks to for the multiple blessings that surround us.  We see words like “thankful”, “blessed”, “grateful”, “gratitude”, displayed on wooden signs, etched on pumpkins & turkeys, and Facebook statuses.  It is that one time a year that we all pause and give thanks.

Each November, I pull out my roll of brown craft paper and we create our Thankful Tree. It is fun to crinkle up the paper and turn it into branches and limbs.  Then we create leaves from a variety of colors.

Throughout the month we all take time to add to our tree.  At first the list is easy: God, Daddy, Mommy, brother, my church, food, my house.  But then you start digging a little deeper.  And there is big difference when asking a three year old what they are thankful for and then asking a twelve year old.

20151117_185125151198490.jpg

My boys love to look at the leaves as they are added.  They notice pretty quick when a leaf has been added.  It is a wonderful way for your child to see you showing thanks for your spouse and others.

There are lots of ways to make a tree.  This is my elementary teacher brain way of displaying our tree.  I know some families that create a tree the day of Thanksgiving and all the guest add leaves to the tree.  One momma told me that they gather limbs from the yard to create their tree.

It’s all about giving thanks and showing your children how to acknowledge thankfulness.

20171104_145545.jpg

Looking Forward,

Amanda


Halloween Candy Turned Cookies

Halloween night was a success in this house.  When you have a ‘tween that is able to fill a complete king-size pillow case with candy, you have a lot of sweets on your hands.  Of course we believe in the Halloween Parent Tax.  Children pay their parents 10% of the candy.  This teaches true life skills.

So what are we going to do with all this candy?  This year we chopped up some of our favorite chocolate bars and made cookies.  And wow!!  The boys are wanting cookies instead of the multiple packages of candy.  It is a win!

We chopped up Snickers, Twix Bars, Kit-Kats, and Reese’s Peanut Butter Cups.  And then added in M&Ms for topping.  And it is a game when we bite into our yummy cookies- what candy did I just eat!

20171105_214931.jpg

Halloween Candy Turned Cookies

3  cups all-purpose flour

1 teaspoon salt

1 teaspoon baking soda

1 cup unsalted butter, softened

2 oz cream cheese

1 1/2 cup light brown sugar, packed

1/2 cup white sugar

2 eggs

4 teaspoons vanilla extract

4 cups of chopped chocolate candy (Kit-Kat, Snickers, Reese’s Cups, Hershey bars, Twix)

½ cup m & m’s for the top

20171104_211456.jpg

Preheat oven to 350 F. Line two baking sheets with parchment paper. Set aside.

In a medium bowl mix together flour, salt and baking soda. Set aside.

In a large bowl cream together butter, cream cheese, brown sugar and white sugar.  Mix in egg and vanilla extract.  Add dry ingredients into wet ingredients until flour is fully mixed.

Fold in chocolate candy.  Using a mini cookie scoop, scoop out dough balls and place 2 inches apart on baking sheet.

Press a few m&m’s gently into the dough ball. Bake for 11-13 minutes. You want them to have a golden brown edge.  If they don’t look quit done, it’s okay.  Remove cookies from oven and let cookies sit on the pan for about 2-3 minutes.  Place cookies on a cooling rack to finish cooling.  Store in airtight container.

Serve with milk and enjoy!

Looking Forward,

Amanda